SpringBoot +Redis +RabbitMQ 实现高并发限时秒杀 |
您所在的位置:网站首页 › springboot 高并发 › SpringBoot +Redis +RabbitMQ 实现高并发限时秒杀 |
SpringBoot +Redis +RabbitMQ 实现高并发限时秒杀
|
1.安装RabbitMQ
docker安装:https://blog.csdn.net/qq_33612228/article/details/103732890 windows安装:https://blog.csdn.net/m0_37034294/article/details/82839494 2.安装Redisdocker安装:https://blog.csdn.net/qq_33612228/article/details/10360918 windows安装:https://blog.csdn.net/qq_39135287/article/details/82686837 springboot整合redis:https://blog.csdn.net/qq_33612228/article/details/103700543 3.安装 Jmeter测试工具windows安装:https://blog.csdn.net/liuyanh2006/article/details/82494548 4.数据库设计1.商品库存表:stock表   CREATE TABLE `stock` (
`id` varchar(64) NOT NULL,
`name` varchar(255) DEFAULT NULL,
`stock` varchar(255) DEFAULT NULL,
`remarks` varchar(255) NOT NULL DEFAULT '' COMMENT '备注',
`update_date` datetime DEFAULT NULL COMMENT '最后更新时间',
`create_date` datetime DEFAULT NULL COMMENT '创建时间',
`update_by` varchar(64) NOT NULL DEFAULT '',
`create_by` varchar(64) NOT NULL DEFAULT '',
`del_flag` char(1) NOT NULL DEFAULT '0' COMMENT '0正常,1删除',
PRIMARY KEY (`id`) USING BTREE
) ENGINE=InnoDB DEFAULT CHARSET=utf8 ROW_FORMAT=DYNAMIC COMMENT='商品库存表';
View Code
CREATE TABLE `stock` (
`id` varchar(64) NOT NULL,
`name` varchar(255) DEFAULT NULL,
`stock` varchar(255) DEFAULT NULL,
`remarks` varchar(255) NOT NULL DEFAULT '' COMMENT '备注',
`update_date` datetime DEFAULT NULL COMMENT '最后更新时间',
`create_date` datetime DEFAULT NULL COMMENT '创建时间',
`update_by` varchar(64) NOT NULL DEFAULT '',
`create_by` varchar(64) NOT NULL DEFAULT '',
`del_flag` char(1) NOT NULL DEFAULT '0' COMMENT '0正常,1删除',
PRIMARY KEY (`id`) USING BTREE
) ENGINE=InnoDB DEFAULT CHARSET=utf8 ROW_FORMAT=DYNAMIC COMMENT='商品库存表';
View Code
2.秒杀订单表:t_order表
CREATE TABLE `t_order` (
`id` varchar(64) NOT NULL,
`order_name` varchar(255) DEFAULT NULL,
`order_user` varchar(255) DEFAULT NULL,
`remarks` varchar(255) NOT NULL DEFAULT '' COMMENT '备注',
`update_date` datetime DEFAULT NULL COMMENT '最后更新时间',
`create_date` datetime DEFAULT NULL COMMENT '创建时间',
`update_by` varchar(64) NOT NULL DEFAULT '',
`create_by` varchar(64) NOT NULL DEFAULT '',
`del_flag` char(1) NOT NULL DEFAULT '0' COMMENT '0正常,1删除',
PRIMARY KEY (`id`) USING BTREE
) ENGINE=InnoDB DEFAULT CHARSET=utf8 ROW_FORMAT=DYNAMIC COMMENT='秒杀订单表';
View Code
5.代码层
1.pom引入
org.springframework.boot
spring-boot-starter-data-redis
org.springframework.boot
spring-boot-starter-amqp
View Code
2.配置application.yml spring: datasource: url: jdbc:mysql://127.0.0.1:3306/test?autoReconnect=true&useUnicode=true&characterEncoding=utf8&serverTimezone=GMT%2B8&useSSL=false username: root password: root1234 # 使用Druid数据源 type: com.alibaba.druid.pool.DruidDataSource driver-class-name: com.mysql.cj.jdbc.Driver druid: filters: stat maxActive: 20 initialSize: 1 maxWait: 60000 minIdle: 1 timeBetweenEvictionRunsMillis: 60000 minEvictableIdleTimeMillis: 300000 validationQuery: select 'x' testWhileIdle: true testOnBorrow: false testOnReturn: false poolPreparedStatements: true maxOpenPreparedStatements: 20 data: redis: repositories: enabled: false redis: database: 0 # redis数据库索引(默认为0),我们使用索引为其他(0-15)的数据库,避免和其他数据库冲突 host: 127.0.0.1 port: 6379 password: 12345678 rabbitmq: #mq配置 host: 127.0.0.1 port: 5672 username: guest password: guest server: port: 8090 logging: config: classpath:logback-spring.xml3.实体类 Order.java
package com.example.demo.entity;
import com.baomidou.mybatisplus.annotation.TableField;
import com.baomidou.mybatisplus.annotation.TableName;
import lombok.Data;
/**
* @author LST
* @version 1.0
* @Description: 订单
* @date 2019-12-27 15:54
*/
@TableName("t_order")
@Data
public class Order extends BasePlusEntity{
private static final long serialVersionUID = 1L;
/**
* 订单名称
*/
@TableField("order_name")
private String orderName;
/**
* 订单用户
*/
@TableField("order_user")
private String orderUser;
}
View Code
Stock 商品库存表
package com.example.demo.entity;
import com.baomidou.mybatisplus.annotation.TableField;
import com.baomidou.mybatisplus.annotation.TableName;
import lombok.Data;
/**
* @author LST
* @version 1.0
* @Description: 商品库存表
* @date 2019-12-27 15:54
*/
@TableName("stock")
@Data
public class Stock extends BasePlusEntity{
private static final long serialVersionUID = 1L;
/**
* 产品名称
*/
@TableField("name")
private String name;
/**
* 存货
*/
@TableField("stock")
private String stock;
}
View Code
4.服务层 StockService存货服务层
package com.example.demo.service;
import com.baomidou.mybatisplus.extension.service.IService;
import com.example.demo.entity.Stock;
/**
* @author lst
* @version 1.0
* @Description: 存货服务层
* @date 2019-12-27 15:54
*/
public interface StockService extends IService {
/**
* 秒杀商品后-减少库存
* @param name 商品名称
*/
void decrByStock(String name);
/**
* 秒杀商品前判断是否有库存
* @param name 商品名称
* @return
*/
Integer selectByName(String name);
/**
* 实现纯数据库操作实现秒杀操作
* @param userName 用户名称
* @param stockName 商品名称
* @return String
*/
String secDataBase(String userName,String stockName);
}
OrderService订单服务层
package com.example.demo.service;
import com.baomidou.mybatisplus.extension.service.IService;
import com.example.demo.entity.Order;
/**
* @author lst
* @version 1.0
* @Description: 订单服务层
* @date 2019-12-27 15:54
*/
public interface OrderService extends IService {
/**
* 订单保存
* @param order 实体
*/
void saveOrder(Order order);
}
View Code
OrderServiceImpl订单实现层
package com.example.demo.service.impl;
import com.baomidou.mybatisplus.extension.service.impl.ServiceImpl;
import com.example.demo.entity.Order;
import com.example.demo.exception.SXException;
import com.example.demo.exception.ServiceExceptionEnum;
import com.example.demo.mapper.OrderMapper;
import com.example.demo.service.OrderService;
import org.springframework.beans.factory.annotation.Autowired;
import org.springframework.stereotype.Service;
/**
* @author lst
* @version 1.0
* @Description: 订单实现层
* @date 2019-12-27 15:54
*/
@Service
public class OrderServiceImpl extends ServiceImpl implements OrderService {
@Autowired
private OrderMapper orderMapper;
/**
* 订单保存
* @param order 实体
*/
@Override
public void saveOrder(Order order) {
if(orderMapper.insert(order) {
//货物购买
stock.setStock(String.valueOf(Integer.parseInt(stock.getStock())-1));
stockMapper.updateById(stock);
});
}
/**
* 秒杀商品前判断是否有库存
* @param name 商品名称
* @return
*/
@Override
public Integer selectByName(String name) {
//查询存货数量
Integer stockNum = 0;
List stockList = stockMapper.selectList(new QueryWrapper().lambda().eq(Stock::getName, name));
if(stockList.size() > 0){
stockNum = Integer.parseInt(stockList.get(0).getStock());
}
return stockNum;
}
/**
* 实现纯数据库操作实现秒杀操作
* @param userName 用户名称
* @param stockName 商品名称
* @return String
*/
@Override
public String secDataBase(String userName, String stockName) {
log.info("参加秒杀的用户是:{},秒杀的商品是:{}", userName, stockName);
String message = null;
//查找该商品库存
Integer stockCount = selectByName(stockName);
log.info("用户:{}参加秒杀,当前商品库存量是:{}", userName, stockCount);
if (stockCount > 0) {
/**
* 还有库存,可以进行继续秒杀,库存减一,下订单
*/
//1、库存减一
decrByStock(stockName);
//2、下订单
Order order = new Order();
order.setOrderUser(userName);
order.setOrderName(stockName);
order.setCreateBy(userName);
order.setCreateDate(new Date());
order.setUpdateBy(userName);
order.setUpdateDate(new Date());
order.setDelFlag("0");
order.setId(IdGenerate.generateId());
orderService.saveOrder(order);
log.info("用户:{}.参加秒杀结果是:成功", userName);
message = userName + "参加秒杀结果是:成功";
} else {
log.info("用户:{}.参加秒杀结果是:秒杀已经结束", userName);
message = userName + "参加秒杀活动结果是:秒杀已经结束";
}
return message;
}
}
View Code
5.配置rabbitmq的实现方式以及redis的实现方式 1)在 service包下面直接新建 MQOrderServiceImpl.java,这个类属于订单的消费队列。
package com.example.demo.service.impl;
import com.example.demo.config.RabbitMqConfig;
import com.example.demo.entity.Order;
import com.example.demo.service.OrderService;
import com.example.demo.utils.IdGenerate;
import lombok.extern.slf4j.Slf4j;
import org.springframework.amqp.rabbit.annotation.RabbitListener;
import org.springframework.beans.factory.annotation.Autowired;
import org.springframework.stereotype.Service;
import java.util.Date;
/**
* @author lst
* @version 1.0
* @Description: MQ订单实现层
* @date 2019-12-27 15:54
*/
@Service
@Slf4j
public class MQOrderServiceImpl {
@Autowired
private OrderService orderService;
/**
* MQ监听订单消息队列,并消费
* @param order
*/
@RabbitListener(queues = RabbitMqConfig.ORDER_QUEUE)
public void saveOrder(Order order) {
log.info("收到订单消息,订单用户为:{},商品名称为:{}", order.getOrderUser(), order.getOrderName());
/**
* 调用数据库orderService创建订单信息
*/
order.setCreateBy(order.getOrderUser());
order.setCreateDate(new Date());
order.setUpdateBy(order.getOrderUser());
order.setUpdateDate(new Date());
order.setDelFlag("0");
order.setId(IdGenerate.generateId());
orderService.saveOrder(order);
}
}
View Code
2)MQStockServiceImpl.java这个属于库存得消费队列。
package com.example.demo.service.impl;
import com.example.demo.config.RabbitMqConfig;
import com.example.demo.entity.Order;
import com.example.demo.service.StockService;
import com.example.demo.utils.IdGenerate;
import com.example.demo.utils.RedisUtil;
import lombok.extern.slf4j.Slf4j;
import org.springframework.amqp.rabbit.annotation.RabbitListener;
import org.springframework.amqp.rabbit.core.RabbitTemplate;
import org.springframework.beans.factory.annotation.Autowired;
import org.springframework.stereotype.Service;
import java.util.Date;
/**
* @author lst
* @version 1.0
* @Description: MQ存货实现层
* @date 2019-12-27 15:54
*/
@Service
@Slf4j
public class MQStockServiceImpl {
@Autowired
private StockService stockService;
@Autowired
private RabbitTemplate rabbitTemplate;
@Autowired
private RedisUtil redisUtil;
/**
* 秒杀商品后-减少库存
* @param name 商品名称
*/
@RabbitListener(queues = RabbitMqConfig.STORY_QUEUE)
public void decrByStock(String name) {
log.info("库存消息队列收到的消息商品信息是:{}", name);
/**
* 调用数据库service给数据库对应商品库存减一
*/
stockService.decrByStock(name);
}
/**
* 使用redis+消息队列进行秒杀实现
* @param userName 用户名称
* @param stockName 商品名称
* @return String
*/
public String secKill(String userName,String stockName) {
log.info("参加秒杀的用户是:{},秒杀的商品是:{}", userName, stockName);
String message = "";
//调用redis给相应商品库存量减一
Long decrByResult = redisUtil.decrBy(stockName);
if (decrByResult >= 0) {
/**
* 说明该商品的库存量有剩余,可以进行下订单操作
*/
log.info("用户:{}秒杀该商品:{}库存有余,可以进行下订单操作", userName, stockName);
//发消息给库存消息队列,将库存数据减一
rabbitTemplate.convertAndSend(RabbitMqConfig.STORY_EXCHANGE, RabbitMqConfig.STORY_ROUTING_KEY, stockName);
//发消息给订单消息队列,创建订单
Order order = new Order();
order.setOrderName(stockName);
order.setOrderUser(userName);
rabbitTemplate.convertAndSend(RabbitMqConfig.ORDER_EXCHANGE, RabbitMqConfig.ORDER_ROUTING_KEY, order);
message = "用户" + userName + "秒杀" + stockName + "成功";
} else {
/**
* 说明该商品的库存量没有剩余,直接返回秒杀失败的消息给用户
*/
log.info("用户:{}秒杀时商品的库存量没有剩余,秒杀结束", userName);
message = "用户:"+ userName + "商品的库存量没有剩余,秒杀结束";
}
return message;
}
}
View Code
6.RabbitMqConfig 和redisUtil工具类 1.RabbitMqConfig.java
package com.example.demo.config;
import org.springframework.amqp.core.*;
import org.springframework.amqp.support.converter.Jackson2JsonMessageConverter;
import org.springframework.amqp.support.converter.MessageConverter;
import org.springframework.context.annotation.Bean;
import org.springframework.context.annotation.Configuration;
/**
* @author LST
* @version 1.0
* @Description: RabbitMQConfig插件配置
* @date 2019-12-27 16:23
*/
@Configuration
public class RabbitMqConfig {
//库存交换机
public static final String STORY_EXCHANGE = "STORY_EXCHANGE";
//订单交换机
public static final String ORDER_EXCHANGE = "ORDER_EXCHANGE";
//库存队列
public static final String STORY_QUEUE = "STORY_QUEUE";
//订单队列
public static final String ORDER_QUEUE = "ORDER_QUEUE";
//库存路由键
public static final String STORY_ROUTING_KEY = "STORY_ROUTING_KEY";
//订单路由键
public static final String ORDER_ROUTING_KEY = "ORDER_ROUTING_KEY";
@Bean
public MessageConverter messageConverter() {
return new Jackson2JsonMessageConverter();
}
/**
* 创建库存交换机
* @return
*/
@Bean
public Exchange getStoryExchange() {
return ExchangeBuilder.directExchange(STORY_EXCHANGE).durable(true).build();
}
/**
* 创建库存队列
* @return
*/
@Bean
public Queue getStoryQueue() {
return new Queue(STORY_QUEUE,true);
}
/**
* 库存交换机和库存队列绑定
* @return
*/
@Bean
public Binding bindStory() {
return BindingBuilder.bind(getStoryQueue()).to(getStoryExchange()).with(STORY_ROUTING_KEY).noargs();
}
/**
* 创建订单队列
* @return
*/
@Bean
public Queue getOrderQueue() {
return new Queue(ORDER_QUEUE);
}
/**
* 创建订单交换机
* @return
*/
@Bean
public Exchange getOrderExchange() {
return ExchangeBuilder.directExchange(ORDER_EXCHANGE).durable(true).build();
}
/**
* 订单队列与订单交换机进行绑定
* @return
*/
@Bean
public Binding bindOrder() {
return BindingBuilder.bind(getOrderQueue()).to(getOrderExchange()).with(ORDER_ROUTING_KEY).noargs();
}
}
View Code
2.RedisCacheConfig.java
package com.example.demo.config;
import com.fasterxml.jackson.annotation.JsonAutoDetect;
import com.fasterxml.jackson.annotation.PropertyAccessor;
import com.fasterxml.jackson.databind.ObjectMapper;
import org.springframework.beans.factory.annotation.Autowired;
import org.springframework.cache.CacheManager;
import org.springframework.cache.annotation.EnableCaching;
import org.springframework.context.annotation.Bean;
import org.springframework.context.annotation.Configuration;
import org.springframework.data.redis.cache.RedisCacheManager;
import org.springframework.data.redis.connection.RedisConnectionFactory;
import org.springframework.data.redis.core.HashOperations;
import org.springframework.data.redis.core.ListOperations;
import org.springframework.data.redis.core.RedisTemplate;
import org.springframework.data.redis.listener.RedisMessageListenerContainer;
import org.springframework.data.redis.serializer.Jackson2JsonRedisSerializer;
import org.springframework.data.redis.serializer.StringRedisSerializer;
/**
* @ClassName: RedisCacheConfig
* @Description: redis 缓存配置;
* 注意:RedisCacheConfig这里也可以不用继承:CachingConfigurerSupport,
* 也就是直接一个普通的Class就好了 这里主要我们之后要重新实现
* key的生成策略,只要这里修改KeyGenerator,其它位置不用修改就生效了。
* 普通使用普通类的方式的话,那么在使用@Cacheable的时候还需要指定KeyGenerator的名称;
* 这样编码的时候比较麻烦。
* @author: lst
* @date: 2019年12月25日 下午3:30:19
*/
@Configuration
@EnableCaching // 启用缓存,这个注解很重要;
public class RedisCacheConfig {
@Autowired
private RedisConnectionFactory redisConnectionFactory;
/**
* 缓存配置初始化一个cacheManager
* @param connectionFactory
* @return
*/
@Bean
public CacheManager cacheManager(RedisConnectionFactory connectionFactory) {
RedisCacheManager redisCacheManager = RedisCacheManager.builder(connectionFactory).build();
return redisCacheManager;
}
/**
* 防止redis入库序列化乱码的问题
* @param redisConnectionFactory
* @return RedisTemplate
*/
@Bean
public RedisTemplate redisTemplate(RedisConnectionFactory redisConnectionFactory) {
RedisTemplate redisTemplate = new RedisTemplate();
redisTemplate.setConnectionFactory(redisConnectionFactory);
// 使用Jackson2JsonRedisSerialize 替换默认序列化
Jackson2JsonRedisSerializer jackson2JsonRedisSerializer = new Jackson2JsonRedisSerializer(Object.class);
ObjectMapper objectMapper = new ObjectMapper();
objectMapper.setVisibility(PropertyAccessor.ALL, JsonAutoDetect.Visibility.ANY);
objectMapper.enableDefaultTyping(ObjectMapper.DefaultTyping.NON_FINAL);
jackson2JsonRedisSerializer.setObjectMapper(objectMapper);
// 设置value的序列化规则和 key的序列化规则
redisTemplate.setValueSerializer(jackson2JsonRedisSerializer);
redisTemplate.setHashKeySerializer(new StringRedisSerializer());
redisTemplate.setHashValueSerializer(new StringRedisSerializer());
redisTemplate.setKeySerializer(new StringRedisSerializer());
redisTemplate.afterPropertiesSet();
return redisTemplate;
}
/**
* 重写hashOperations
* @param redisTemplate
* @return
*/
@Bean
public HashOperations hashOperations(RedisTemplate redisTemplate) {
return redisTemplate.opsForHash();
}
/**
* 重写listOperations
* @param redisTemplate
* @return
*/
@Bean
public ListOperations listOperations(RedisTemplate redisTemplate) {
return redisTemplate.opsForList();
}
/**
* redisMessageListenerContainer
* @return
*/
@Bean
public RedisMessageListenerContainer redisMessageListenerContainer() {
RedisMessageListenerContainer redisMessageListenerContainer = new RedisMessageListenerContainer();
redisMessageListenerContainer.setConnectionFactory(redisConnectionFactory);
return redisMessageListenerContainer;
}
}
View Code
3.RedisUtil.java部分代码
/**
* 对指定key的键值减一
* @param key 键
* @return Long
*/
public Long decrBy(String key) {
return redisTemplate.opsForValue().decrement(key);
}
View Code
7.controller提供了二个方法,一个为redis+rabbitmq实现高并发秒杀,第二个则用纯数据库模拟秒杀,出现超卖现象。
package com.example.demo.controller;
import com.example.demo.result.RestResponse;
import com.example.demo.result.ResultGenerator;
import com.example.demo.service.StockService;
import com.example.demo.service.impl.MQStockServiceImpl;
import io.swagger.annotations.Api;
import io.swagger.annotations.ApiOperation;
import lombok.extern.slf4j.Slf4j;
import org.springframework.beans.factory.annotation.Autowired;
import org.springframework.web.bind.annotation.PostMapping;
import org.springframework.web.bind.annotation.RequestParam;
import org.springframework.web.bind.annotation.RestController;
/**
* @author LST
* @version 1.0
* @Description: 秒杀
* @date 2019-12-28 20:59
*/
@RestController
@Api(value = "SecKillController", tags = "秒杀控制层")
@Slf4j
public class SecKillController {
@Autowired
private MQStockServiceImpl mQStockService;
@Autowired
private StockService stockService;
/**
* 使用redis+消息队列进行秒杀实现
* @param userName 用户名称
* @param stockName 商品名称
* @return String
*/
@PostMapping(value = "sec-kill",produces = "application/json")
@ApiOperation(value = "redis+消息队列进行秒杀实现", notes = "redis+消息队列进行秒杀实现", produces = "application/json")
public RestResponse secKill(@RequestParam(value = "userName") String userName, @RequestParam(value = "stockName") String stockName) {
return ResultGenerator.genSuccessResult(mQStockService.secKill(userName, stockName));
}
/**
* 实现纯数据库操作实现秒杀操作
* @param userName 用户名称
* @param stockName 商品名称
* @return String
*/
@PostMapping(value = "sec-data-base",produces = "application/json;")
@ApiOperation(value = "实现纯数据库操作实现秒杀操作", notes = "实现纯数据库操作实现秒杀操作", produces = "application/json")
public RestResponse secDataBase(@RequestParam(value = "userName") String userName, @RequestParam(value = "stockName") String stockName) {
return ResultGenerator.genSuccessResult(stockService.secDataBase(userName, stockName));
}
}
View Code
8.需要在springboot得启动类中进行对redis得初始化,简而言之就是调用我们上面写得方法,新建一个redis缓存,模拟商品信息。
package com.example.demo;
import com.example.demo.utils.RedisUtil;
import org.springframework.beans.factory.annotation.Autowired;
import org.springframework.boot.ApplicationArguments;
import org.springframework.boot.ApplicationRunner;
import org.springframework.boot.SpringApplication;
import org.springframework.boot.autoconfigure.SpringBootApplication;
@SpringBootApplication
public class DemoApplication implements ApplicationRunner {
public static void main(String[] args) {
SpringApplication.run(DemoApplication.class, args);
/*SpringApplication springApplication = new SpringApplication(DemoApplication.class);
ConfigurableApplicationContext configurableApplicationContext = springApplication.run(args);
//解决WebSocket不能注入的问题 第一种方法
WebSocketServerController.setApplicationContext(configurableApplicationContext);*/
}
@Autowired
private RedisUtil redisUtil;
/**
* redis初始化商品的库存量和信息
* @param args
* @throws Exception
*/
@Override
public void run(ApplicationArguments args) throws Exception {
redisUtil.setValue("watch", 10, (long)20000);
}
}
View Code
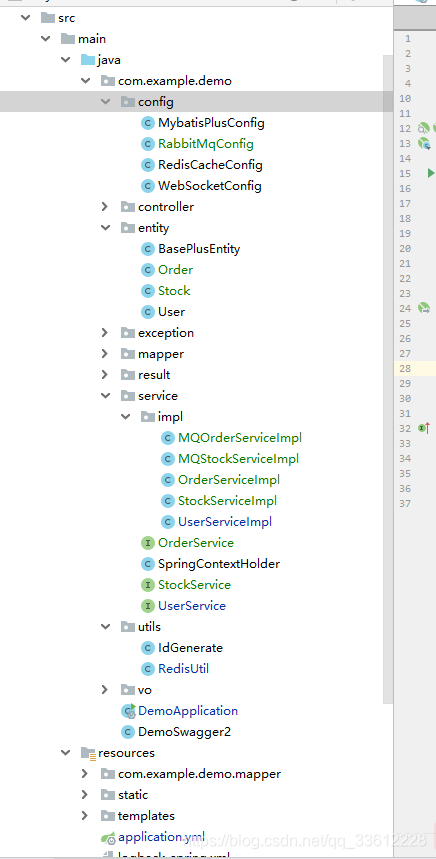
项目结构图
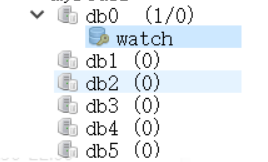
1.项目启动时,redis里的watch会初始化10。
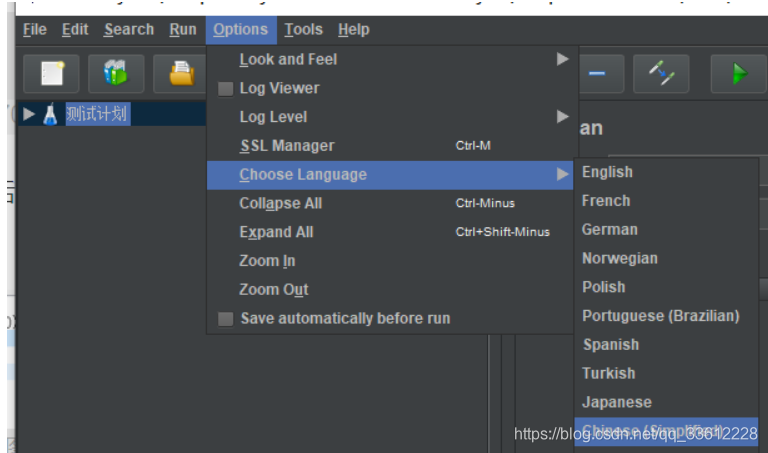
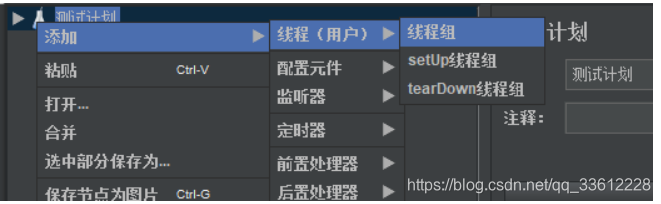
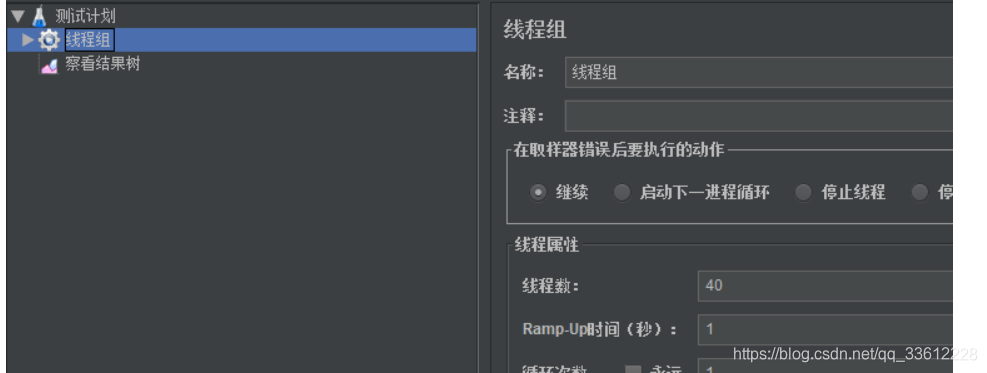
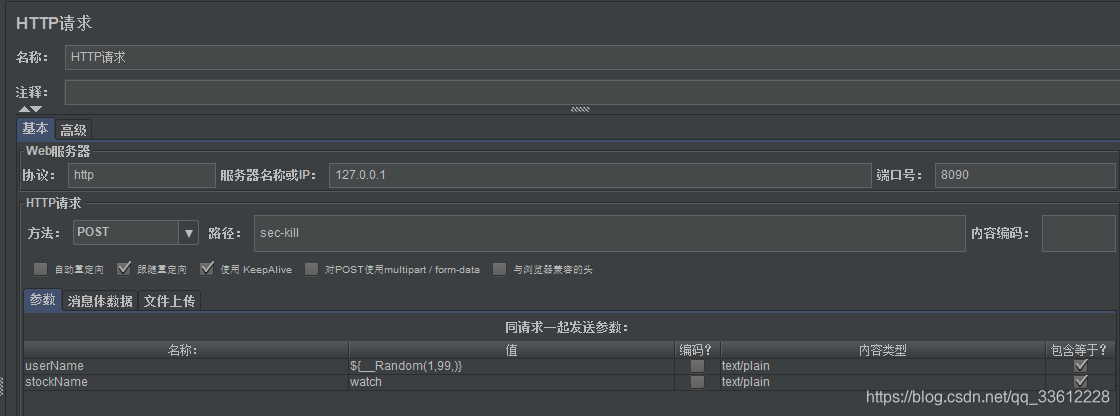
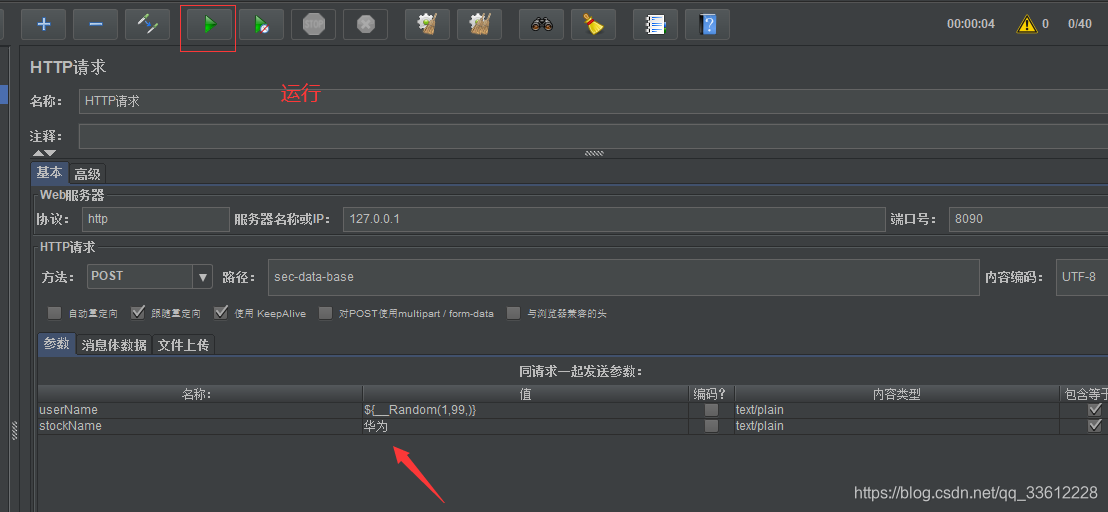
2.打开我们得JMeter工具运行测试(具体使用Jmeter可自行百度) 1)选择中文 2)完成中文之后,我们在测试计划右键,添加一个线程组。 3)给这个线程组的数量为40,这个线程组的作用就是模拟40个用户发送请求,去秒杀;然后再在线程组右键,添加一个Http请求,这个就是我们用来发送请求的组件了
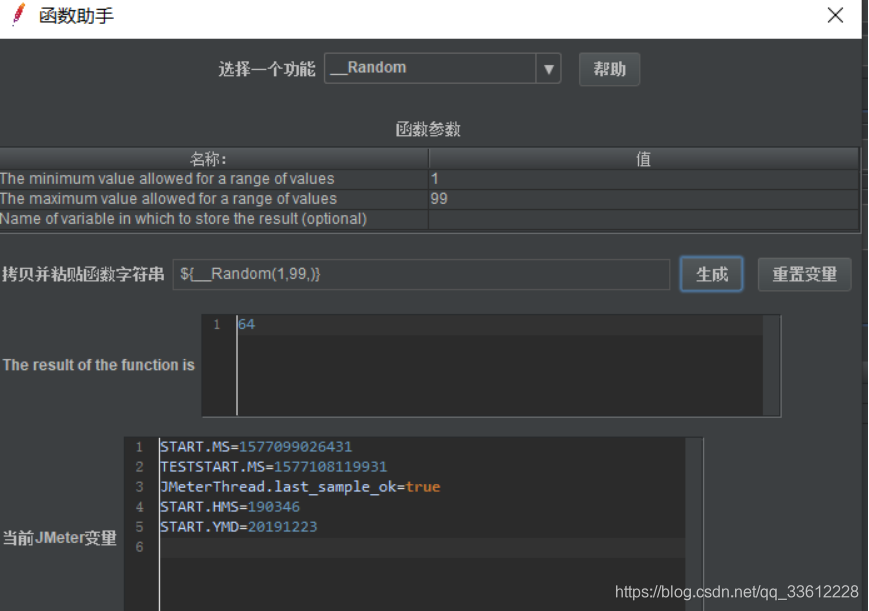
4)这个请求唯一要说得就是,随机参数了,因为用户名肯定不可能给40个相同得名字,这边我们利用JMeter给用户名得值为随机数点击上方得白色小书本,选择random,1-99得随机数。
5)然后我们把这个函数字符串复制到http得参数上面去。
最后点击运行按钮运行。
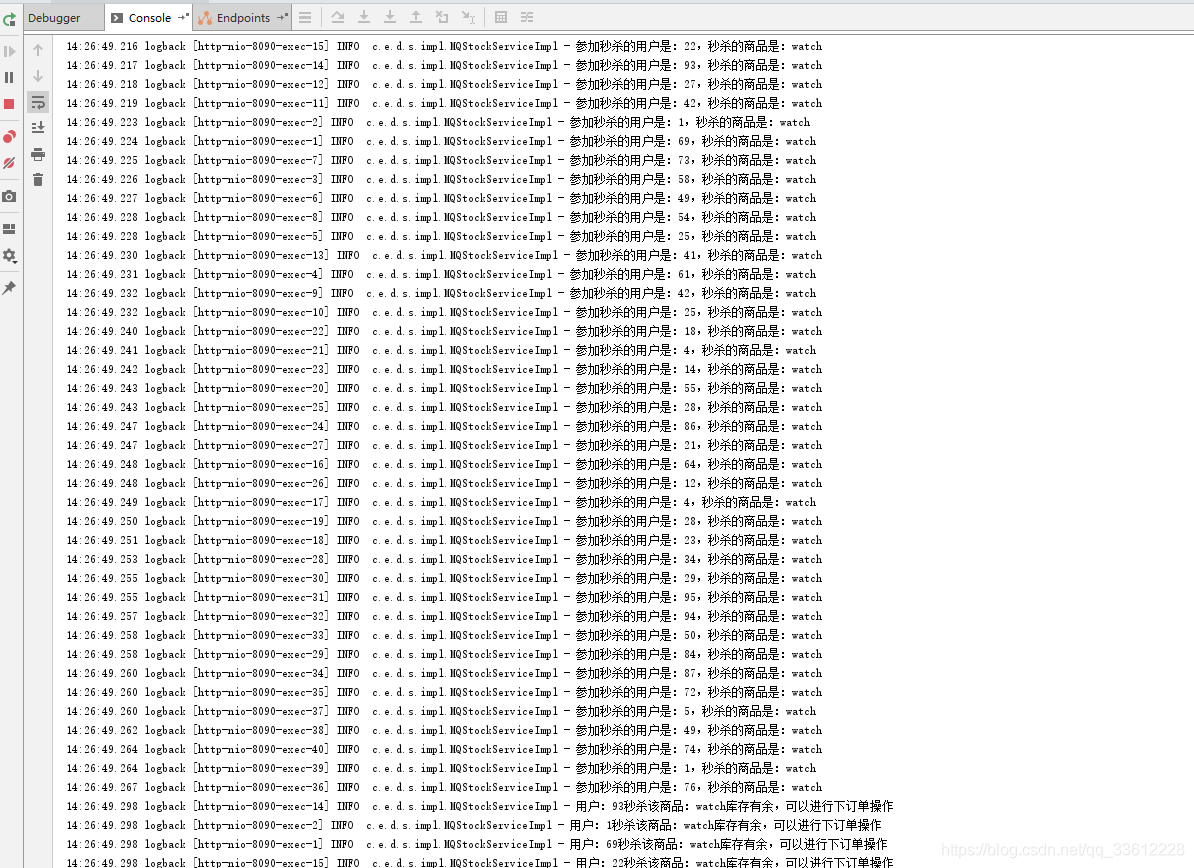
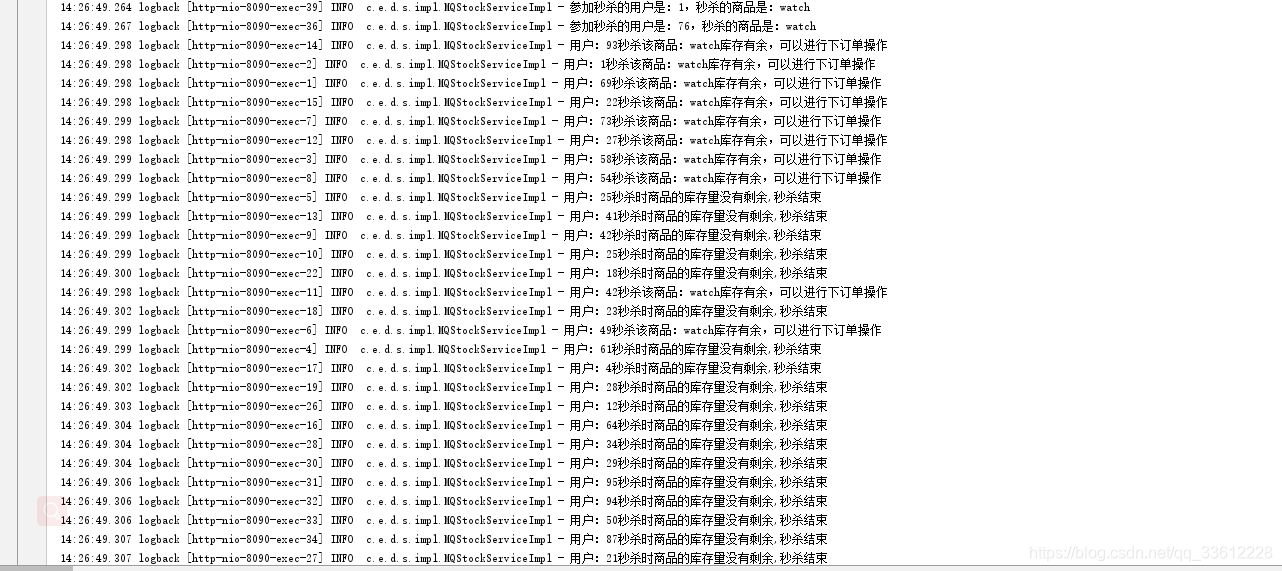
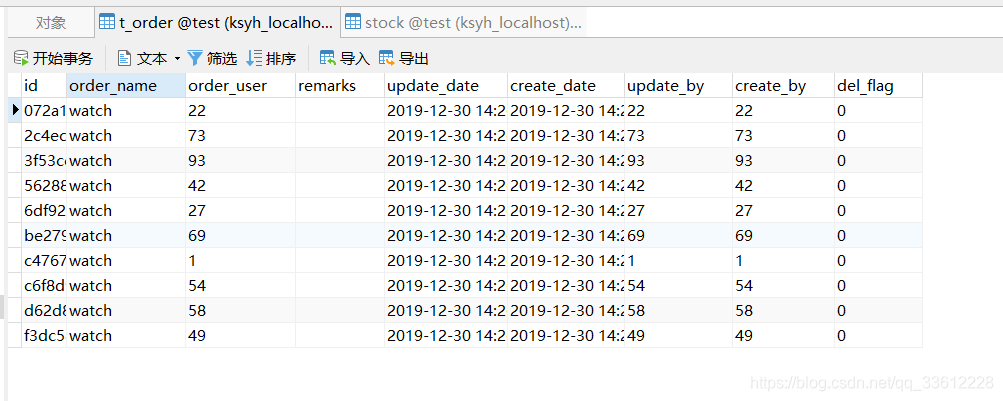
5)查看控制台日志,可以看到运行结果已经打印到控制台了,用户名为我们生成的随机数。
再来看下数据库订单表t_order,就保存了10条数据(秒杀成功的),我们初始化的时候给watch库存得数量为10,而我们使用JMeter模拟了40个人发请求,所以这10条数据,也就是40个用户中抢到商品的10个人,也就是线程,谁抢到就是谁得。
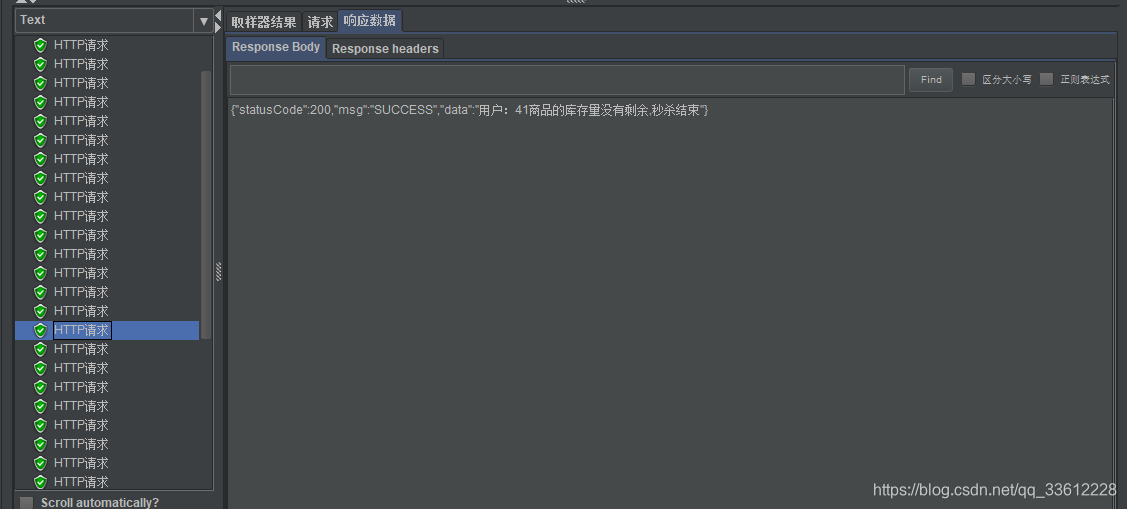
6)再来查看下我们得结果树
7.上面我们实现了redis+rabbitmq得秒杀,现在我们看看纯数据库方式得秒杀,看看有什么区别: 1)首先网stock库存表新增一条数据,类似于redis得初始化 2)在jmeter中修改原来得http请求信息,其中华为对应数据库得商品名,url改成sec-data-base,清空一下结果树,我们开始运行。
3)查看控制台日志
16:03:42.335 logback [http-nio-8090-exec-17] INFO c.e.d.service.impl.StockServiceImpl - 参加秒杀的用户是:95,秒杀的商品是:华为
Creating a new SqlSession
SqlSession [org.apache.ibatis.session.defaults.DefaultSqlSession@7d2c25bc] was not registered for synchronization because synchronization is not active
JDBC Connection [com.alibaba.druid.proxy.jdbc.ConnectionProxyImpl@35fa3e98] will not be managed by Spring
==> Preparing: SELECT id,name,stock,remarks,create_by AS createBy,create_date AS createDate,update_by AS updateBy,update_date AS updateDate,del_flag AS delFlag FROM stock WHERE del_flag='0' AND name = ?
==> Parameters: 华为(String)
16:03:42.358 logback [http-nio-8090-exec-13] INFO c.e.d.service.impl.StockServiceImpl - 参加秒杀的用户是:63,秒杀的商品是:华为
Parameters: 华为(String)
Preparing: INSERT INTO t_order ( id, order_name, order_user, create_by, create_date, update_by, update_date, del_flag ) VALUES ( ?, ?, ?, ?, ?, ?, ?, ? )
==> Parameters: e5f250658400411ba80ae850576d929e(String), 华为(String), 63(String), 63(String), 2019-12-30 16:03:42.39(Timestamp), 63(String), 2019-12-30 16:03:42.39(Timestamp), 0(String)
Parameters: 华为(String)
Parameters: 华为(String)
==> Parameters: e361068837b145fb92fbe4627483e7cd(String), 华为(String), 12(String), 12(String), 2019-12-30 16:03:42.462(Timestamp), 12(String), 2019-12-30 16:03:42.462(Timestamp), 0(String)
|


【本文地址】
今日新闻 |
推荐新闻 |